Showing posts with label dotting tool. Show all posts

Thursday, 8 December 2016

THE BODY SHOP PENGUINS

Hey guy, another post? Yep! So a long long time ago The Body Shop sent me 3 nail polishes and a dotting tool and asked for this penguin design. 
I'm really sorry it's so late but better late than never? This is so easy to do, the only tool I used was the dotting tool. I'm pretty sure I did a tutorial, where that is though I'm really not sure?! oops
So I can't remember the name of the colours, I'll check when I go back home! 

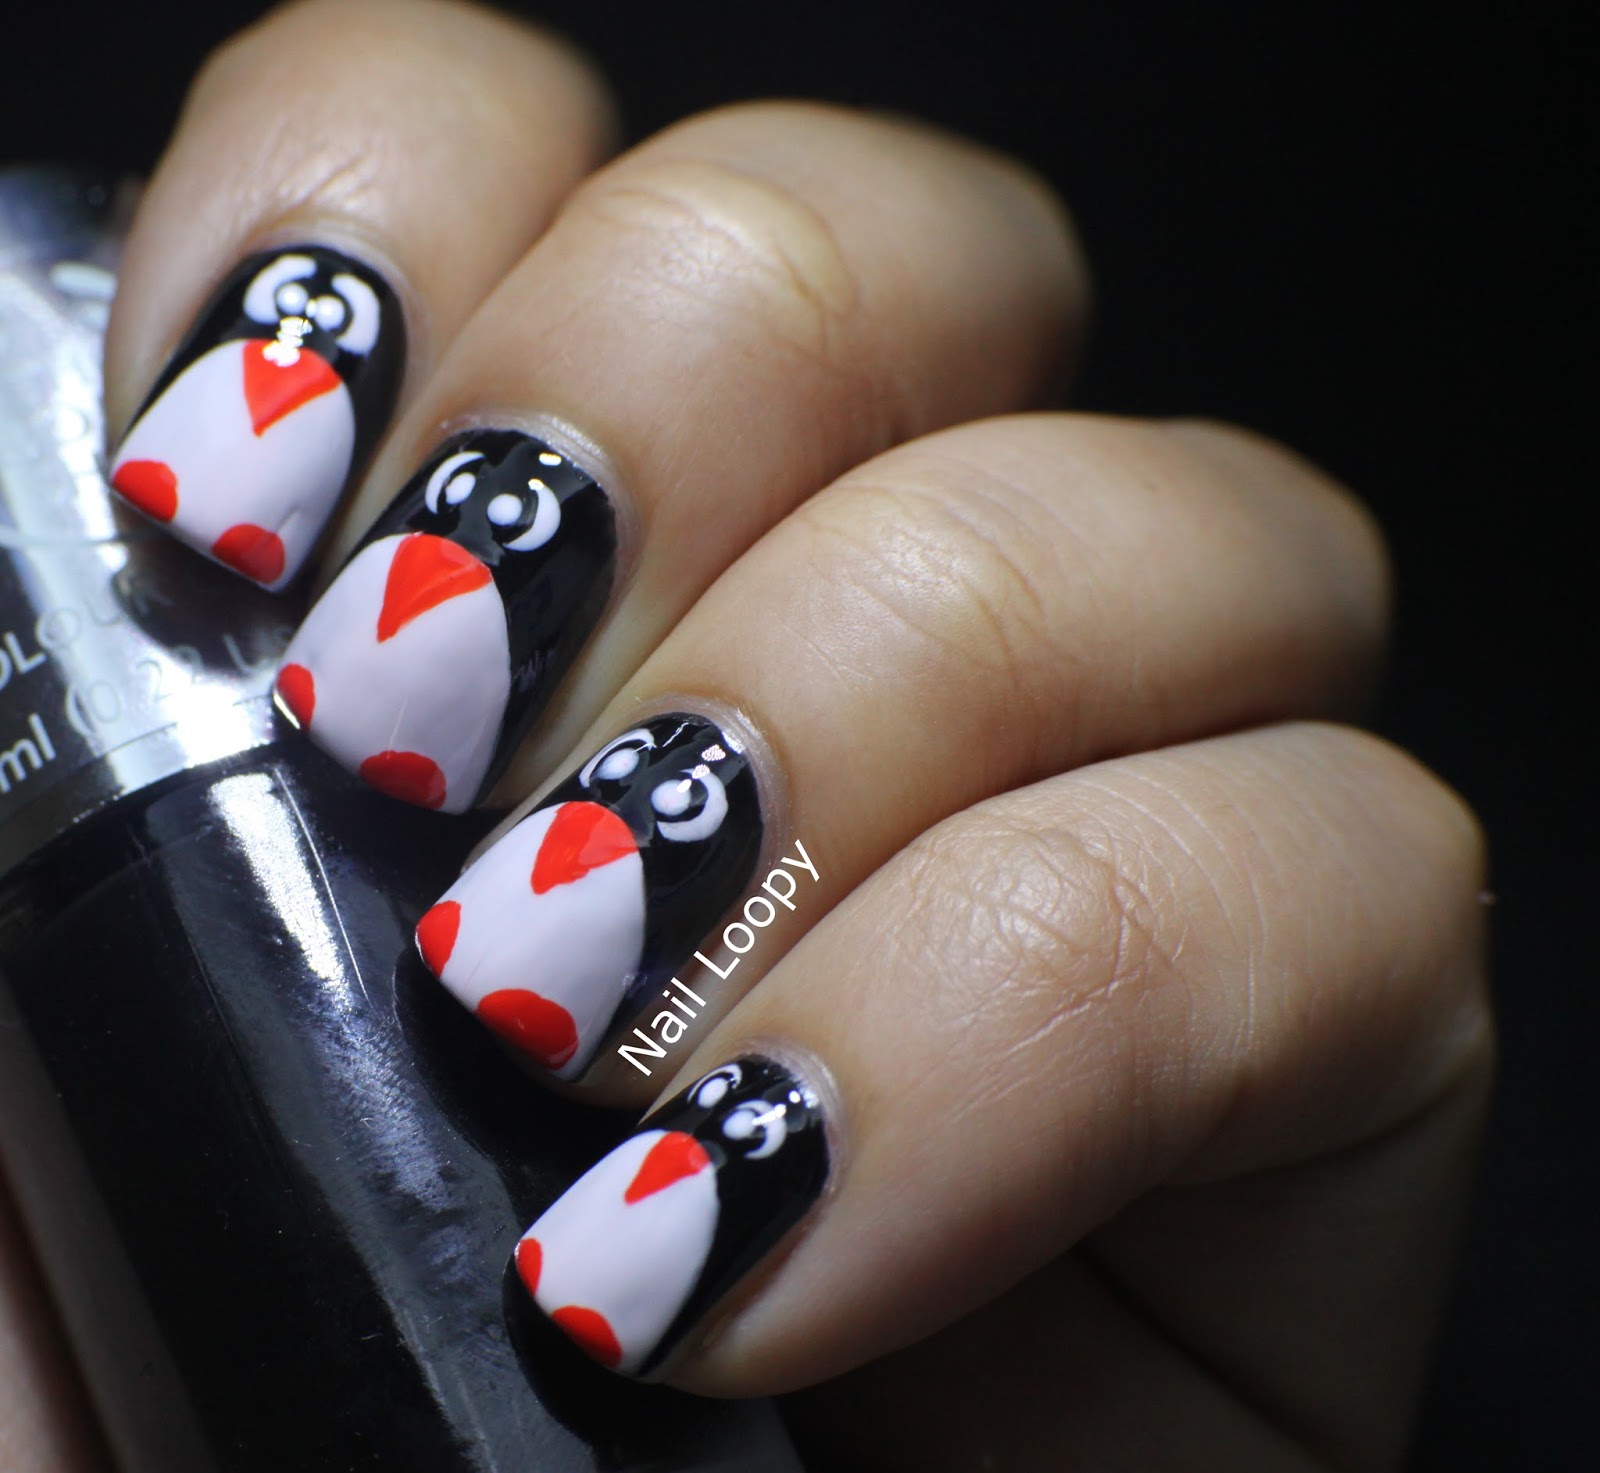
Anyway, paint on a black base, use the white(ish) colour to dot the eyes near the cuticle and then outline and fill in the white tummy of the penguin. Once it's dry use the orange to paint on the feet and nose. With the black dot on the eyes and finally use the white colour again to do the final dot of the eyes. 
It's really easy and looks so cute! So give it a try!
You can get all the colours here and the dotting tool here. They make really good stocking fillers! 


Pin It

Sunday, 2 November 2014

SWAMP NAILS WITH THE BODY SHOP

Is it Sunday again already? Time goes way too fast! I hope you all had a lovely weekend, I had a lovely much needed break from university work this weekend which has helped recharge my batteries for the upcoming week!
So tonight I have some nail art which was inspired by The Body Shop Colour Crush nail polish in Hemp Over Heels*. I decided to use it as a base for swamp nails lol! This is one my type of colours though so I love these nails but I know they might not be to everyone's taste! 
For the drips (which I haven't done in ages) I used brown acrylic paint a dotting tool and my nail art brush before adding a generous layer of topcoat. 


Pin It

Monday, 27 October 2014

VAMPIRE LIPS NAIL VINYL HALLOWEEN NAILS

Hey guys, how was your Monday? Mine was long but I have a late start tomorrow, yaay! 
Tonight I have another Halloween nail design to share with you using the vampire lips nail vinyls from She Sells Seashells. I painted all my nails with w7 Black and then applied the vinyls on the tips of the nails and used red acrylic paint to paint on the 'blood drips' on the accent nail before applying topcoat. 


Pin It

Friday, 1 August 2014

INTERLOCKING DOTS NAIL ART TUTORIAL

Hey guys, I posted a couple of Interlocking dot nail art a while ago and I got a few requests for a tutorial. So that's what I have for you today! 

If you want to see how to do these nails just read on :)


What you will need: 

Base Coat
2 (or more) different nail polishes. I'm using Illamasqua Noble and Jo'mina 
Dotting Tool*
Top Coat

STEP 1 - After base coat, paint half of the nail diagonally with your first colour. It doesn't have to be perfect.

STEP 2- Paint the other half of the nail with your other colour. 

STEP 3 - Using your dotting tool, make dots along the middle line, where the colours meet, making sure you leave a similar sized gap between each dot. 

STEP 4 - Again using the dotting tool and the 2nd colour and create dots in the gaps you made before

STEP 5 - Add a layer of top coat. 

And that is it, yep it's really simple and easy to do, so do give it a try and share them with me! 
Enjoy your weekend :) 

Pin It

Thursday, 3 July 2014

BARRY M GELLY RAINBOW INTERLOCKING DOTS

Hey folks, I've been busy these past few days and tired so I haven't had a chance to post anything and this is my last ready to use post so I probably won't be posting again until next Tuesday. 
Anyway today's nails, I've used all Barry M Gelly polishes and done interlocking dots again in a rainbow pattern. Starting from the pinky I used Satsuma, Mango, Papaya, Key Lime, Green Berry, Damson, Blue Grape and finally Plum. 
This was a bit of fail unfortunately if you look at the interlocking dots I did which don't actually look like they're interlocking haha! But the colours look really lovely together so it's all good!


Ok, take care guys. I shall you see next week probably, in the meantime follow me on Twitter and Instragram to keep up to date and to see behind the scenes and nail mail etc. 


Pin It

Tuesday, 1 July 2014

BARRY M INTERLOCKING DOTS

Hey guys, how's your week going? So I've seen the interlocking circles nail design so many times and it's been on my list of things to do but that list has over 7836 things on it so you can imagine why it's taken me a while. 
Anywho for these nails I did 2 coats of Barry M Gelly in Kiwi and then painted one half of the nail diagonally and then used a dotting tool to do the rest of the details. It's super easy and super fast to do. Oh and these colours aren't very colour accurate, my camera hates blues and greens so whilst this looked gorgeous irl my camera messed up the colours!


Ok, so that's it for today. My next post is also an interlocking dots mani, can you guess the colours? 


Pin It

Saturday, 14 June 2014

EASY SUMMER FLOWER NAILS

Hey guys, a really quick post from me today before I head off to bed. I can't remember if I saw this design on instagram and where, when my brain is working I will check! 
Ok so I love yellow for summer and Essie Shorty Pants is my favourite yellow ever! I started off with 3 coats and used OPI Alpine Snow and a dotting tool to make the flowers, then I added a gold circle glequin in the centre of each flower. Unfortunately when the white flowers dried they ended up looking yellow :( 


Ok, so that's it for now, I shall see you tomorrow hopefully :)

Pin It

Sunday, 9 February 2014

MINNIE MOUSE NAILS WITH BOW STUDS

Hey everyone, boo it's Sunday night, I have a full week of uni to look forward to! I'm planning a trip to Sally's though tomorrow so hopefully I can find something nice for there.
Anyway so a little while ago me and the lovely Sarah did a little swap and in the package she included a little bag with some gorgeous nail studs, decals and other embellishments she sells in here store She Sells Seashells. The store stocks loads of different nail art accessories for a really good price and it's based in the UK which means that you'll get your order in only a few days aaand shipping is a very reasonable £1/£1.20 for orders under £25 and free for anything above £25!
Ok, so that's a bit of background into the shop, now let's talk nails!
 I decided to use the 3mm bow rhinestones* in black and silver. I thought they'd work really well in a Minnie Mouse inspired design, so I started with two coats of OPI Big Apple Red, then used OPI Alpine Snow and a dotting tool to create the polka dots. 
To stick on the rhinestone I applied a small dot of top coat where I wanted the rhinestone to sit on the nail before applying a generous amount of topcoat (which smudged some of my design) 


I loved this, it was so cute and the rhinestone held up really well and was flat on the nail. 
You can buy these rhinestones here for £1.25 !

* this product was sent to me as a gift
Pin It

Wednesday, 24 July 2013

NUDE & BLUE POLKA DOTS

I have not done polka dots in such a long time ! So for this I started with two coats of OPI San Tan Tonio and then used a dotting tool and created some polka dots using Essie Butler Please and then I applied topcoat!
Simple, but so cute !


Pin It

Friday, 8 March 2013

LOADED HEARTS !

So this mani almost never made it here, I'm not sure if I like it actually, this was supposed to be for Valentine's day but it didn't make it! 
So really quickly for these nails I started off with 3 coats of Illamasqua Load and red acrylic paint for the rest of the details !


Sorry for the really quick post but I'm really tired and I'm just heading off to bed ! See you tomorrow guys !

Pin It

Monday, 16 July 2012

THE BIG BANG THEORY NAILS - BAZINGA

Hey guys how are you all today? The weather here is pants so no holo : (  instead I thought I'd share my big bang theory nails with you, I tried to recreate the famous ball pit scene but it looked better in my head and tbh. I was being lazy and couldn't be bothered drawing Sheldon's head lol  ! 

Anyway yeah I just used the end of a tailors pin because my dotting tool  heads were too small for the balls and I just dotted on different balls in different colours and then I used black acrylic paint to write on bazinga ! 
Hope you like it, I can't remember all the different polishes I used but if anybody is desperately wanting to know I'll put them in : )


I hope this mani made you smile and I'll talk to you all soon : ) 

Pin It

Thursday, 8 March 2012

GOOGLE - INTERNATIONAL WOMENS DAY

I've had a really long day and don't really feel much like talking but I wanted to show you this mani I did for today
I love rolling the mouse over the different google images and logo's and seeing what events/ days etc. are going o n around the world. 
Today I thought it looked soo cute, and decided it to copy the logo onto my nails , here you are 


and in case you haven't seen it here's the picture 
I did this in 10 mins, so it's not perfect, in fact it's pretty poor, please excuse the dry horrid cuticles and uneven nails ! 
Pin It