I enlisted the help of my brothers and it was quite fun making them and I thought I'd share the recipe with you, in case any of you want to try it !
They didn't turn out as well as I'd hoped and by the end of it we were just dumping in any colour because we'd made toooo much mixture, so there were a few funky ones ! loll
And what inspired me to make these is my nails, whilst feeling really low in inspiration a couple of days ago I thought I'd try create the buns on my nails and I loved it on my nails, but I thought I'd wait until I'd made some so I could share the recipe with you too.
Wow enough talking let's get cracking !

Disclaimer : I am pretty hopeless at baking and presentation isn't one of my biggest concerns loll, so please excuse the crappy presentation and pictures, and Amy Grace if your reading this post please don't be appalled by my shocking baking abilities, (seriously guys, have you seen the cakes she makes, they look too good to eat !)
This is going to be a really long post so click to see the recipe and nails after the jump ! : )
What you'll need
1 large mixing bowl and 5 smaller ones
wooden spoon/spatula
teaspoon
tablespoon
bun tray and bun cases
Makes 6 buns
50g Soft Margarine
50g Caster Sugar
50g Self Raising Flour
1 egg
1 table spoon baking powder ( I forgot to add this but they turned out just fine!)
1 tablespoon vanilla essence/flavouring
Pinch of salt
Red, Orange, Green, Yellow, Blue food colouring
Let's get started
- Heat the oven to 180C (gas mark 4? I think)
- Add the margarine to the large bowl and then add the sugar and your pinch of salt and mix until all blended together
- Then add the flour and mix again
- Beat the egg in a separate bowl and then add and mix again until you get a smooth consistency, but not too runny (should look something like this)
- Then add your vanilla essence
- Ok, separate your mixture in an equal mounts into 6 bowls and add the red food colouring to one bowl, the green to another etc. for the purple just add a little bit of red and blue colouring and using your own judgement add more of either food colouring to get your desired colour ( please excuse the mismatched bowls ! )
- Ok, now line your baking tray with bun cases and start layering your mixtures, working from back to front ie. purple first and red should be on the top !
- Then bung them in the oven for about 15 mins, if your not sure if they're done stick a knife through it and when you pull the knife, the knife is wet (has some of the raw mixture on it) then it needs to be in for a little longer and if it's starting to burn on top then turn the heat down !
this is what it should look like once you've layered all the colours
Once it's ready take it out
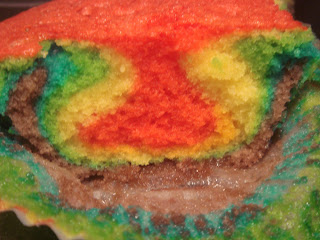
you can add icing sugar if you want, but this is what it looks like inside ! cool right? not as good as i'd wanted but they taste yummy *nom nom* !
If you try this please leave a link so I can check it out or email me your pics : )
Tweet
Pin It


haha this is very funny to combine nails and cupcakes in one post :D
ReplyDeletevery nice
http://lanisrandomblog.blogspot.com/