Thursday 30 May 2013

FROSTBITE GRADIENT

Hi everyone, how are you all? So I'm back with a tan and about 30 new polishes (oops) lol, let me know if you guys want to see a haul post in the comments!
I have a tonne of pictures to edit but I just don't have the time at the moment, as soon as I finish typing up this post I'll be starting revision again.
So this started off with 2 coats of China Glaze Frostbite, a gorgeous blue with the most beautiful shimmer, I then used OPI - Bring On The Bling to do the reverse glitter gradient. It's a bit patchy but otherwise I like it :)


Pin It

Thursday 23 May 2013

ILLAMASQUA SCARAB & CLARINS 230 !

Hi everybody, hwo are you all doing ? Sorry for my absence but it's been crazy busy recently and I haven't really had time to paint my nails ! 
Anywho today I finished my exam and spent the day packing, cleaning the house, swatching and editing photos, which was fun but tiring but tomorrow I go on holiday, Yaay ! It'll be the first time I fly alone tomorrow and I'm a nervous flyer, so I'm feeling a bit nervous now but I have Candy Crush and it should be ok !
Right ok, onto nail matters, recently I manged to get my hands on the highly sought after Clarins 230 (for an unbelievable price too) ! 
When I first got into nail polish seriously I couldn't see the fascination with this polish or duochromes/multichromes in general,  but then one day I woke up and saw what I'd been missing and ony of my biggest lemmings was born. Well I can tell you guys, this definitely did not disappoint ! 

Below the swatches you see are 2 coats of Illamasqua Scarab and 2 coats of Clarins 230

This is a very very pic heavy post, you've been warned!


Eeek ! Sorry for the 'claw' but the colour shift looks amazing here !


Underwater shots 


Well ... that was a lot of pictures right, I hope I've managed to show just how gorgeous this polish is! 
There was not a single time that I looked down at my nails and I didn't see a colour shift, and in my honest opinion this is a million times better than it's dupes. This is definitely worth the splurge, trust me, when you get this on your nails you'll forget how much you paid for it so if your thinking about getting it I say go for it! 
Or maybe you already have this? 

Pin It

Saturday 18 May 2013

ONE STROKE FAIL ART!

Oh man, this was such a fail but to be perfectly honest I didn't mind because this was just one of those mani's  that just kinda happened ! 
The colours didn't blend together and the leaf on the middle finger is just too big! 
For this I just used Sally Hansen Instadry in Whirlwind White along with red, blue, green and yellow acrylic paint and a black gel pen for the rest of the detail


Not really anything more to say about these nails ! Have you had any nail fails recently?

Pin It

Sunday 12 May 2013

MISTY BLUSH WITH MORE ONE STROKE NAIL ART

Hi guys, I'm really cold and I have a lot of work to do so you'll probably see about 5 more posts from me, mainly because it takes too long to edit the photos! Anywho onto today's nails...
I already had Layla Misty Blush on and it's such a gorgeous colour and holo, the holo effect is really strong but it doesn't totally mask the unique base colour ! 
So after a full day of wearing this I decided to add some nail art, I wanted to try out some more one stroke flowers. This time I decided to do them in black and white because Misty Blush flashes every colour of the rainbow and I thought it would be a nice contrast!
I did like a double petal flower thing on my pinky and pointy finger but it's not very noticeable. I didn't topcoat this design as I didn't want to dull the holo underneath!
Unfortunately I  didn't have the sun available to take some shots in direct sunlight to show off the full potential of the holo so all the shots below are with a daylight bulb but just imagine the holo rainbow to be 10x as strong ;) 


The thing I most loved about this mani was the contrast between the intense holo and the black and white art! What do you guys think? Is this something you would wear?


Pin It

Wednesday 8 May 2013

MAYBELLINE COLOR SHOW NAILS - POLKA DOT COLLECTION REVIEW & SWATCHES!

Hi guys, I'm super excited about what I have to show you today.
 A few people recently posted  pictures of these beauties on Facebook and I knew I needed them ! I am missing the pink one but I didn't really want that one but I may pick it up to review if I come across it in my travels! In the meantime you can see swatches of them here and here
Ok this is really picture heavy so I've inserted a jump, click more to read full reviews and see lots more photos of these beautiful polishes!


Pin It

Monday 6 May 2013

GLITTER GRADIENT TUTORIAL

Hi guys, so I hope you all enjoyed your bank holiday here in the uk :) Today I have a new tutorial for you! 
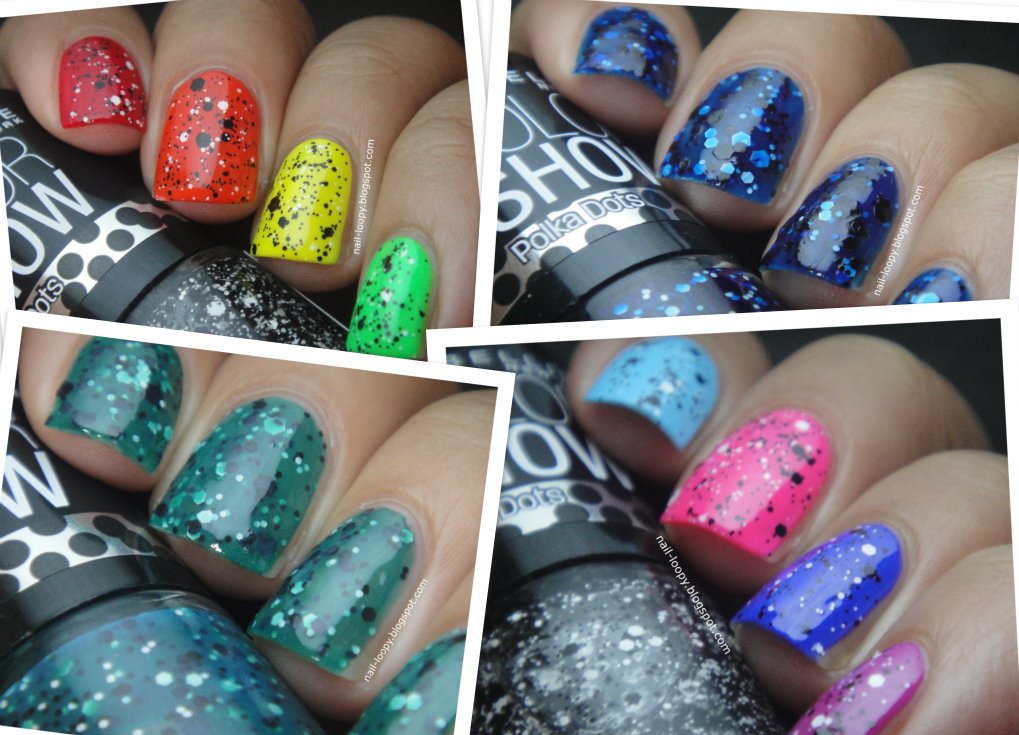
I've recently posted quite a few glitter gradient mani's here, here and here and subsequently had a few requests for a tutorial so here you are guys! 
I have lots more glitter gradients to show you in upcoming posts so I thought now would be a good time to share this tutorial with you in case you wanted to try it out for yourselves!

Ok, let's get started, I've done my regular pictorial but I've also included a little diagram at the end of the tutorial to help explain a little bit better!


What you will need 
Base Coat 
Base Colour (I'm using China Glaze Liquid Leather)
Glitter nail polish (I'm using Color Club Gingerbread)
Topcoat 

STEP 1- Apply your base colour (after base coat)


STEP 2 - Wipe the majority of glitter off the nail polish brush (so it's mostly dry)  

Now brush on some of the glitter onto the top 2/3 of the nail. Start from the tip and drag the polish towards the cuticle. The glitter should be sparse at this point.  


STEP 3 - Apply more polish to the top 1/3 of the nail now, make sure your brush doesn't have too much polish on as it will ruin the gradient effect. 
Drag the polish from the tip down again to help you spread the glitter out. 


STEP 4 - For the next step I like to have a good amount of glitter on the brush (not too much though!)

Apply a thick layer of glitter to the very tips of the nail, then wipe off the excess polish from the brush and blend the glitter slightly so there are no harsh clumps of glitter, which will ruin the gradient efftect. 

STEP 5 - Finally, when your gradient is dry, apply topcoat 


Right so that's fairly simple right, but just to help you a little bit further I've included this little diagram to show you some guidelines for applying the glitter!


For Step 1 apply a sparse layer of glitter upto the pink line, for Step 2 start at the tip and stop at the blue line, for Step 3 stop at the green line. 
Ok so I hoped that made things a bit clearer and didn't just confuse you lol !

Any questions please ask, any other requests please leave a comment and if you try this mani out be sure to share it with me as there's something exciting coming up!


Pin It