Saturday, 27 April 2013

JUICY ROYAL GLITTER HALF MOON NAILS

Hi guys, have you entered my giveaway here
Anywho I hope your enjoying your weekend, I'm spending my weekend studying and cleaning, what a fun combination, right?!
So onto nail business, I haven't done half moon nails in what seems like an eternity, so I decided it was about time I cracked out the hole reinforcement stickers. For these nails I started out with 2 coats of Sally Hansen Lady Luck (and I concentrated the glitter near the cuticle). Once that had dried (after about 10 minutes) I applied the reinforcement stickers and painted the rest of the nail with 2 coats of Revlon Royal and applied one coat of topcoat!
This looked so shiny, juicy and squishy in real life ! I loved it :)


What do you think? When was the last time you did a half moon mani?

Pin It

Thursday, 25 April 2013

GIVEAWAY !

Hi guys, I was meant to post this before I went away on holiday but I just didn't get the time to finish it! So anyway here you are, better late than never right! I missed my blogiversary but I still wanted to do this giveaway because honestly? You guys are awesome, you make this blog and I love reading all your lovely comments  and I just wanted to give something back to you :)
The theme for this giveaway is kind of a best of British polish I picked out some of my favourite shades from some of my favourite brands :)


All you have to do is fill in the rafflecopter form below and that's it !

Giveaway will end on 03/05/2013 
It is open internationally 
(you guys will probably have heard of the stricter uk laws so posting overseas is a much bigger risk now, I will post it internationally and cross my fingers and toes that it arrives safely but if it is destroyed I cannot be held responsible) 
It starts on the 26/04/2013
All false/duplicate entries will be removed
Those who follow just for the giveaway will be disqualified from any future giveaways/competitions. 

Also to add a little bit of fun, keep your eyes peeled in future posts because there will be chances to gain extra entries. For example, in a post I may hide a code or a word which if you find and comment you will gain an extra 10 points etc. That is all I'm saying so you will have to find the clues yourself now, good luck. 


a Rafflecopter giveaway

I think I've covered everything, let me know if there are any problemos :) Good luck guys
Pin It

Wednesday, 24 April 2013

GLITTER GRADIENT WITH POKE N' HOLO

Hi guys how are you all doing? I'm in a good mood today after having a long and stressful day yesterday. 
Anywho I have some more glitter gradient manis to show you and here's todays ! It didn't turn out as well as the last one but I still like it ! 
So for this I started off with 3 coats of Illamasqua Poke on all my nails (except the ring finger so it looks different) and then I decided to use China Glaze Glistening Snow for the glitter, mainly because I thought it would complement the silver shimmer in Poke and it's holographic which is always good!


Of course this was a lot more holographic in real life, and I love it :)


Pin It

Monday, 22 April 2013

BONDI - THE LIMELIGHT FISHTAIL NAILS

Hi guys, I hope you had a good weekend.
 Today I thought I'd share with you all a new nail polish brand ! 

'Bondi New York is a collection of 20 fashion forward colors which are free from formaldehyde, formaldehyde resin, camphor, DBP and toluene. The collection has been formulated to be long lasting and chip resistant. Fast Facts about Bondi New York:
  • 5 free (formaldehyde, formaldehyde resin, camphor, DBP & toluene).
  • 20 fashion forward colors which will launch twice a year, as well as four limited edition collections.
  • Available via select on line retail partners, as well as bondinewyork.com.
  • 100% of the net profit (after costs) is donated to our non-profit which makes grants to organizations like Food Bank for New York City.'
So that's a bit of background about the company, now onto the polish. I chose The Limelight as it looked the most unique and I don't think I have a dupe, (I just checked and I dont :). 
The polish took just over a week to arrive and came beautifully packaged and also included a lovely Thankyou card, I shared a picture on my Instagram so go and check that out if your interested. 
I applied 3 coats here, the formula was a little streaky at 2 but otherwise applied beautifully ! It dries to a  satiny finish so topcoat is needed if you want a glossy look!
 The colour is a beautiful bright lime perfect for summer, I will definitely be wearing this again when the sun starts to make more of an appearance!
I added a bit of nail art to jazz it up a bit (not that it needed it) I used green and black acrylic paint and drew on these fishtails! 
End Result = I love it !


I must add I love the bottle and the black satin cap (which I actually just found out is removable!) 

These polishes retail for $15.00 here, which means it is a bit on the pricey side but the formula, the colours and the overall ordering experience means it's worth every penny, in my opinion!


Bondi polishes can be bought from their website or from Harlow&Co, I definitely recommend you check them out!

*Some of the products in this post were sent to me for my honest review. See my disclosure policy for more details

Pin It

Wednesday, 17 April 2013

CATRICE PEACHY GLITTER GRADIENT

Hola ! How are you guys today, I'm so tired, its been a long day :( We had CPR training at work this morning and everyone ended up talking about my nail polish whilst I was doing chest compressions lol!

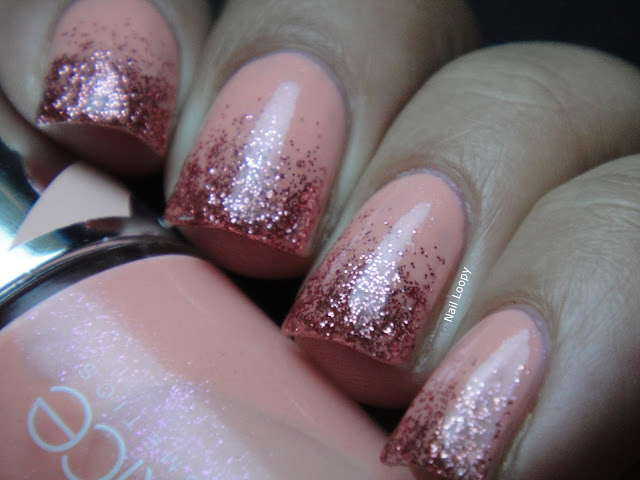
So I haven't really done any glitter gradients in like forever, mainly because every time I tried I used a makeup sponge for the glitter and it never worked out how I wanted it to. So a couple of weeks ago I saw someone mentioning that they just applied the glitter using the polish brush and though 'hey! let's give it a try' and I'm sharing the results with you today :)
I started off with 3 thin coats of Catrice Walk On Air and then used Butter London Rosie Lee for the glitter !  I'm actually really pleased with the way it turned out, If anyone wants to see a tutorial let me know and I'll rustle one up for ya!
Also one thing I wanted to mention about Rosie Lee is that the glitter is actually tiny square glitters, I thought they were hex shaped but no they're square and awesome :) If you enlarge the pictures you can see it more clearly!


So how do you guys feel about glitter gradients? I love it and I can guarantee you'll be seeing more of them in the near future!

Pin It

Tuesday, 16 April 2013

MORE ONE STROKE FLOWER NAILS !

Hi guys, I'm sorry I've been away for a while ! I wanted to post a giveaway before I left for holiday but I just didn't get a chance to get the rafflecopter thingy completed. I would have done it on holiday but we were staying on the coast and we spent most of the week without internet or phone signal ! We had an awesome time though, I didn't really find any nail polishes, we did spend a day in Calais but the only polish I picked up was some OPI on the ferry which I shared on my Instagram. 

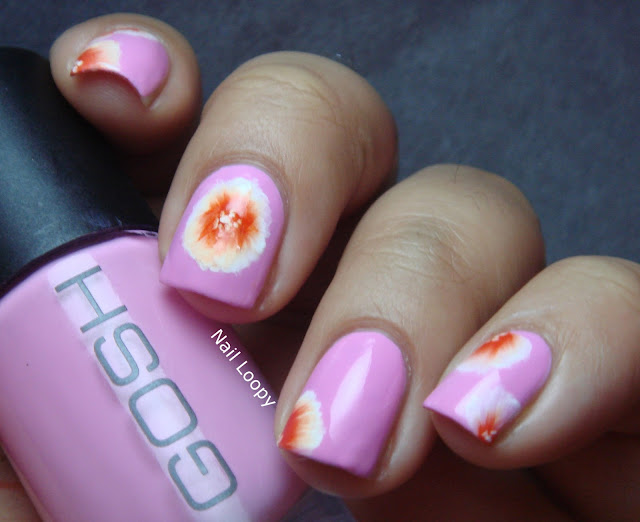
Anywho onto nail business, I decided to try out the one stoke technique again and this one wasn't as good as  I'd hoped they'd be. I started off with 2 coats of Gosh Bubblegum and then used white and red acrylic paint to paint in the flowers and petals. 
The flower on the middle finger was the biggest fail but otherwise the rest of the petals turned out ok. 


Lots of people requested a tutorial for my last one stroke mani, I am working on a video for that so keep an eye out for that and I also mentioned at the beginning of this post I have a giveaway planned and you'll see that in the next couple of days hopefully! 
Alrighty then, I'll see you guys in the next post, take care till then chica's :)

Pin It

Monday, 1 April 2013

ONE STROKE FLOWERS 1ST TRY

Hi guys, are you ready to go back to work tomorrow? I'm work evening shifts so I'm going polish shopping tomorrow morning to cheer myself up, hehe :)

Anywho onto nail business, I've finally given the one stroke technique a go; way back in January when I should have been revising I ended up spending  half a day (and a night) procrastinating by watching loads of one stroke videos on youtube and I was completely fascinated ! I couldn't wait to try it out and was sure it would be the first thing I tried out after I'd finished my exams, well funny how the best laid plans of mice and men often go awry right? 
Well anyways I finally gave this technique a go a couple of weeks ago and today I'll show you my first try.  
It's not prefect, in fact it's far from it but the colours seem to work together which is why I think I've got away with it here!


There's obviously room for improvement, but I'm quite pleased with this! What do you guys think and have you tried this technique out?

Pin It